|
You can use the Dispensary module tabs to complete a variety of tasks related to items. This includes checking requested kits in and out, transferring kits, marking items as lost or found, and replacing kit instruments.
 Check Out Items Check Out Items
After you review the submitted dispensary requests and prepare the requested items, you can check them out of the dispensary location so that providers can use them for their appointments.
The Inventory/Dispensary modules can be integrated to track sundry item usage and inventory levels simultaneously. If using the integration, the product level adjusts automatically in the linked inventory store when you check a sundry item out.
To check out items:
- Open the Dispensary module and click Check Out to display the Check Out window.
- Complete the fields as necessary and click Check-Out.
Tip: You can also press Enter to check out the kit.
| Field
|
Description
|
| Scan Items Out For
|
Select a radio button to identify the date/time the item will be considered scanned out of the dispensary location, and if necessary, select a date and time.
- Current Date/Time: If selected, the item will be considered checked out as of the current date and time in axiUm.
- Date/Time: If selected, the item will be considered checked out as of the set date and time.
Example: Providers may want to check out items on the Friday before their Monday morning appointments. When they check out the items, the dispensary staff can set the Date field to Monday and the Time field to the provider’s appointment time.
|
| User Login / Provider Code
|
If necessary, click in the field and scan the provider’s ID or click the ellipsis to display the Users List (Providers Only) or Providers List window and select a user or provider.
Note: The field displays according to the Dispensary Options window > Identify Provider By field.
|
| Provider
|
A disabled field that displays the first and last name of the provider associated to the provider ID or user login ID displayed in the Provider Code field or the User Login field. |
| Dispensary Item
|
Click in the field and scan or manually enter the kit bar code.
Note: If the kit is past its sterilization expiry date, axiUm displays a warning, prompting you to re-sterilize the kit before checking out to the provider.
|
| Check Out Without Request
|
(Optional) Select the checkbox if the provider is checking out the item without a dispensary request.
|
The checked out item displays in the list below.
Note: Disposable sundries do not display in the list below because they do not need to be checked back in later.
-
Repeat Step 2 as necessary for all other items.
-
(Optional) Click Print to send the receipt to the default printer.
Note: The Print button is only enabled once you click Check-Out or press Enter.
-
Close the Check Out window.
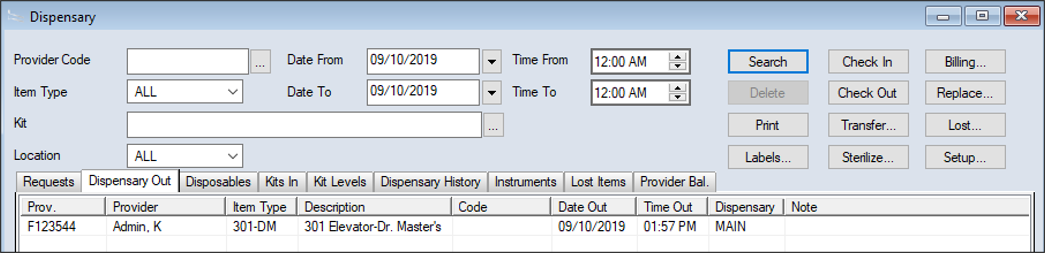
All checked out items now display in the Dispensary Out tab or the Disposables tab.
Check In Items
When a provider arrives at the dirty dispensary location with their items, a staff member can check in the items.
Sometimes the items may be unused and still have intact sterilization wrappers.
Example: A provider checks out a kit for their appointment, but the patient fails to attend. Because the sterilization wrapper is still present on the kit, the kit is still sterile.
Depending on your institution’s workflow, the dirty location may be a cart that can then be used to bring the items to the sterilization location.
The Inventory/Dispensary modules can be integrated to track sundry item usage and inventory levels simultaneously. If using the integration, the product level adjusts automatically in the linked inventory store when you check a sundry item in.
To check in items:
- Open the Dispensary module and click Check In to display the Check In window.
- Complete the fields as necessary and click Check-In.
Tip: You can also press Enter to check in the item.
| Field
|
Description
|
| To Location
|
Select the location the kit will be returned to from the drop-down list.
|
| User Login / Provider Code
|
If necessary, click in the field and scan the provider’s ID or click the ellipsis to display the Users List (Providers Only) or Providers List window and select a user or provider.
Note: The field displays according to the Dispensary Options window > Identify Provider By field.
|
| Provider
|
A disabled field that displays the first and last name of the provider associated to the provider ID or user login ID displayed in the Provider Code field or the User Login field. |
| Dispensary Item
|
Click in the field and scan or manually enter the kit bar code.
Note: If the Provider Code / User Login field is disabled, the Provider Code / User Login and Provider fields auto-populate with the Provider ID when you enter an item into the field.
|
| Is Sterile?
|
Select the checkbox if the item being returned still has its sterilization wrapper and has not been used.
|
-
Repeat Step 2 as necessary for all other items.
-
(Optional) Click Print to print the return receipt from the default printer.
Note: The Print button is only enabled once you click Check-In or press Enter.
-
Close the Check In window.
All checked in items now display in the Kits In tab.
Transfer Items
You can transfer items from one location to another to move them throughout the dispensary cycle. Depending on your institution’s workflow, this may be done with or without a transfer cart.
When completing the transfer, you can transfer a specific number of individual items or the entire contents of a location.
Example: All the dirty kits were scanned into the dirty cart at the end of clinic session, and you want to transfer the cart’s contents to the sterilization location.
To transfer items:
- Open the Dispensary module and click Transfer... to display the Transfer Kits window.
- Complete the fields as necessary.
| Field
|
Description
|
| Transfer
|
Select a radio button:
- Individual Kit(s): If selected, this indicates you are transferring one or multiple kits from the location, but not all.
- All Kits from Location: If selected, this indicates you are transferring all kits in a location.
Example: You want to transfer all kits from a cart to a final dirty dispensary.
Note: If All Kits from Location is selected, the Kit field is replaced with a Location field.
|
| Transfer to
|
Select the location the kit(s) will be transferred to from the drop-down list.
Note: If transferring to a cart location, the Destination field is enabled and must be completed to identify the kit’s final destination.
|
| Destination
|
If necessary, select the final location for the kit(s) from the drop-down list. |
| Kit
|
Note: This field only displays if the Individual Kit(s) radio button is selected.
Click in the field and scan or manually enter the kit bar code or sterilization bar code.
|
| Location
|
Note: This field only displays if the All Kits from Location radio button is selected.
Scan or manually enter the bar code for the location the items will be transferred from.
Example: If transferring the contents of an entire cart to a sterilization location, you can scan the cart’s bar code.
Note: If the location is not set with a bar code, an error displays.
|
- Click Transfer.
Note: If you wait several seconds, axiUm auto-completes your transfer.
If transferring one kit, a “1 Item(s) successfully transferred” message displays.
If transferring the entire contents of a location, an “<X> Item(s) successfully transferred” message displays.
-
Repeat Steps 2-3 as necessary for all other items you want to transfer.
- (Optional) Click Print to print the transfer receipt to have a record of the item’s transfer to the new location.
Mark Items as Lost
When an item is not returned by a provider after a session, you can mark it as lost. It may be considered lost for a variety of reasons, including whether it is broken, out for repair, or missing. Depending why the item has been marked as lost, you may want to charge the provider a fee because it could not be returned.
To mark an item as lost:
- Open the Dispensary module and click the Dispensary Out or Dispensary History tab.
- In the upper pane, enter the appropriate search criteria and click Search.
.Note: Some fields are only available from specific tabs.
- Select the listed entry that was not returned and click Lost... to display the Kit / Sundry Not Returned window.
- Complete the fields as necessary.
| Field
|
Description
|
| Provider
|
A disabled field that displays the last and first name of the provider the item is checked out to.
|
| Kit / Sundry
|
Note: The field displays depending whether the selected item is a kit or a sundry.
A disabled field that displays item that is checked out and not returned.
|
| Date
|
Select the date that the kit was considered unreturned from the calendar drop-down.
Note: The date defaults to the current date. You cannot select a future date.
|
| Reason
|
Select the reason the item was not returned from the drop-down list.
Note: The options in this drop-down field are defined in Maintenance > Dispensary > Out of Service Reasons.
|
| Charge
|
Note: This field is enabled if the Reason field is set an option that has the Billable to Provider checkbox selected in Maintenance > Dispensary > Out of Service Reasons.
If set, axiUm calculates the item’s billable value and the field defaults to the unreturned item’s replacement cost.
Important: The billable value is the value of the kit cassette that is entered in the Kit Type Codes window > Amount field plus the sum of the values of each instrument in the kit that is entered in the Instrument Codes window > Amount field.
If necessary, you can modify manually the amount charged to the provider.
|
| Billing
|
(Optional) Click the button to display the Dispensary Billings window and bill the provider manually. |
- Click OK to close the Kit / Sundry Not Returned window.
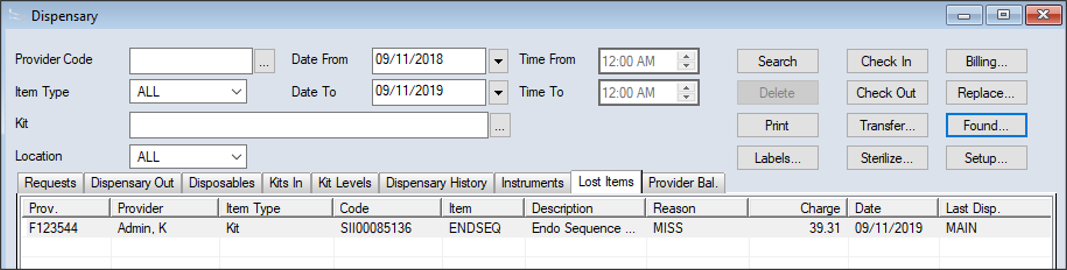
Once an item has been marked as Lost, it displays in the Lost Items tab.
Mark Items as Found
If an item was previously marked as lost, then returned by a provider, you can mark it as found. It may be considered found for a variety of reasons, including whether it has been fixed or has been returned.
If the provider was charged a fee, you may want to refund the provider.
The Inventory/Dispensary modules can be integrated to track sundry item usage and inventory levels simultaneously. If using the integration, the product level adjusts automatically in the linked inventory store when you mark a sundry item as found and check it in.
To mark an item as found:
- Open the Dispensary module and click the Lost Items tab.
- In the upper pane, enter the appropriate search criteria and click Search.
Note: Some fields are only available from specific tabs.
- Select the listed entry that was returned and click Found... to display the Kit / Sundry Not Returned window.
- Complete the fields as necessary.
| Field
|
Description
|
| Provider
|
A disabled field that displays the last and first name of the provider the item is checked out to.
|
| Kit / Sundry
|
Note: The field displays depending whether the selected item is a kit or a sundry.
A disabled field that displays item that is checked out and has been returned.
|
| Date
|
Select the date that the kit was considered returned from the calendar drop-down.
Note: The date defaults to the current date. You cannot select a future date.
|
| Reason
|
A disabled field that displays the reason the item was originally identified as lost, as entered in the Kit / Sundry Not Returned window > Reason field.
|
| Amount Charged
|
A disabled field that displays the value of the item charged to the provider, as entered in the Kit / Sundry Not Returned window > Charge field.
|
| Refund
|
Note: This field is only enabled if the Amount Charged field displays a dollar amount. If the value of this item is unknown and losing it did not incur any charges to the provider, no refund is required for its return.
The field defaults to the refund amount for the item returned.
Note: Money refunded to the provider is a debit (-) to the institution.
If necessary, you can modify manually the amount refunded to the provider.
|
| Billing
|
(Optional) Click the button to display the Dispensary Billings window and refund the provider manually. |
- Click OK to close the Kit / Sundry Not Returned window.
- If prompted to check in the found item, click Yes or No as necessary.

Once an item has been marked as found, it is removed from the Lost Items tab.
Replace Kit Items
You can replace instruments in a kit when needed. Kit instruments may need to be replaced for a variety of reasons.
Examples: The item has been broken, lost, or is at the end of its life cycle.
To replace a kit instrument:
- Open the Dispensary module and click Replace... to display the Replace Kit Instrument window.
Tip: If set up, you may also open the Replace Kit Instrument window while marking items as sterilized.
Important: Depending on how you access the Replace Kit Instrument window, some fields may be auto-populated and/or disabled.
- Complete the fields as necessary.
| Field
|
Description
|
| Was Instrument(s) returned?
|
Select the checkbox if the instrument(s) was returned but is broken or expired.
|
| User Login / Provider Code
|
If necessary, click in the field and scan the provider’s ID or click the ellipsis to display the Users List (Providers Only) or Providers List window and select a user or provider.
Note: The field displays according to the Dispensary Options window > Identify Provider By field.
|
| Last Used By
|
If you completed the Kit field, click the button to display the last and first name of the provider who last used the kit in the Provider field.
|
| Provider
|
A disabled field that displays the first and last name of the provider associated to the provider ID or user login ID displayed in the Provider Code field or the User Login field.
|
| Kit
|
Click in the field and scan or manually enter the bar code.
|
| Date
|
Select the date the item is being replaced from the calendar drop-down.
|
| Reason
|
Select the reason the item is being replaced from the drop-down list. |
-
Press Enter to display the kit items in the section below.
-
Next to each kit item that must be replaced, select the checkbox.
-
Click Save.
For each selected instrument, the Times Used column is reset to 0.
-
(Optional) If you need to replace instruments from other kits, repeat Steps 2-5.
-
When ready, click OK to close the Replace Kit Instrument window.
Manage Billed Items and Payments
Providers can be held accountable for the items they check out. You can search by Provider ID to review the charges, refunds, and payments that make up the provider’s account balance.
Some behavior is calculated automatically by axiUm:
- If you mark an item as lost, axiUm automatically bills the account of the provider who last checked-out the item, using its default replacement cost.
- If you mark an item as found, axiUm automatically refunds the charges the amount that was originally charged to them.
If a provider makes a payment for an item, you can enter the payment manually from the Dispensary Billings window.
To manage a billed item or payment:
- Open the Dispensary module and click Billing… to display the Dispensary Billings window.
Note: If a provider is not selected, the Users List (Providers Only) window displays and prompts you to select a provider first.
- In the Provider Code field, enter the provider code or click the ellipsis to display the Users List (Providers Only) window and select the provider code you want to view.
- Review the Provider and Balance fields that display the provider’s name and current dispensary balance.
- To add an entry:
- Click the Clear Data (
 ) icon. ) icon.
- Complete the fields as necessary and click the Add a new Record (
 ) icon. ) icon.
| Field
|
Description
|
| Date
|
Note: The date defaults to the current date.
If necessary, select the date from the calendar drop-down.
|
| Code
|
Click the ellipsis to display the Billing Codes window and select the correct code.
Note: These are customizable by your institution and may be charge, payment, or refund codes.
Example: If a provider is making a payment for a lost item, select a payment code so that the amount is removed from the provider’s balance owing.
|
| Amount
|
Enter the cost of the item being billed, refunded, or paid for.
|
| Description
|
This field defaults to the billing code’s description, as entered in the Billing Codes window > Description field.
This description will print on the receipt if the Print on Receipt checkbox is selected in the Billing Codes window.
|
- (Optional) Click Receipt… to display the Dispensary Receipt window and print a receipt.
-
(Optional) Click Statement… to display the Dispensary Statement window and print a statement.
- Complete the fields as necessary and click Print.
| Field
|
Description
|
| From / To
|
Select the start and end dates for the dispensary statement from the calendar drop-down fields.
|
| Comment1 / Comment2
|
Enter any free-form comments to display on the dispensary receipt.
|
| # Copies
|
Enter the number of copies you want to print.
|
-
When ready, close the Dispensary Billings window.
|